
Introduction
Welcome back to the next chapter in our ongoing journey to electrify and enhance the world of lawn care and landscaping. In this installment, we’ll dive into a crucial aspect of any project—facing challenges head-on and discovering innovative solutions. Every endeavor, no matter how well-planned, presents its fair share of hurdles. It’s in overcoming these obstacles that we truly grow as innovators.
As we explore the challenges I encountered during the development of the electric sleeve hitch, you’ll gain insights into the complexities of transforming ideas into reality. The road to success is rarely without bumps, and our story is no exception. But with perseverance, adaptability, and a healthy dose of problem-solving, we’ve been able to overcome each obstacle and continue on our path of innovation.
Join me as I share the challenges I faced, the solutions I discovered, and the valuable lessons learned along the way. Let’s dive into the world of problem-solving and creative thinking, where the true magic of innovation happens.


The Wrong Size Actuator: A Measuring Misstep
One of the crucial elements in any DIY project is accurate measurements. In the early stages of our electric sleeve hitch project, we meticulously took measurements, as detailed in Part 1 of our journey. With these measurements in hand, we thought we had found the perfect fit for our system—a 6″ linear actuator.
However, a crucial detail escaped our initial planning: the exact mounting location. As we progressed with the installation, we realized that we needed to position the actuator slightly lower than our original measurements. This adjustment brought about an unexpected challenge: the 6″ linear actuator did not offer enough travel upwards, preventing us from attaching anything to the sleeve hitch effectively. The unintended consequence was that the garden tractor’s rear wheels were left suspended in the air, rendering the setup impractical and unwieldy.
Additionally, the original 6″ linear actuator we initially selected was rated for a 250 lb capacity. While this capacity technically met our requirements, we decided to take a more robust approach. We opted for a 4″ linear actuator with a higher weight capacity, which would provide an extra layer of assurance for our system’s stability.
This change in the size and capacity of the linear actuator was a pivotal moment in our project. It underlines the importance of adaptability in any DIY venture. When a challenge arises, it’s essential to evaluate your options, make necessary adjustments, and select components that align more closely with your project’s specific needs.
Not Placing Actuator High Enough
The switch to a more appropriately sized 4″ linear actuator was undoubtedly a step in the right direction. However, even with this crucial change, there was another hurdle to overcome—an oversight in the actuator’s placement.
As the new actuator was installed, it became evident that it wasn’t positioned high enough on the sleeve hitch. This oversight meant that the hitch was still situated too low for attachments to be raised effectively. Despite the actuator’s improved size and capacity, it couldn’t resolve this fundamental issue.
To address this challenge, we had to go back to the drawing board, or rather, the hitch. We had to find a way to raise the actuator to a more suitable height, ensuring that it could lift and lower attachments as intended. This solution involved drilling new holes higher on the hitch, allowing us to reposition the actuator for optimal functionality.
This adjustment underscored the importance of meticulous planning and installation in any DIY project. Sometimes, it’s the seemingly small details that can make a significant difference in the overall success of a project. In this case, proper placement ensured that our electric sleeve hitch could fulfill its intended purpose.

Bending The Actuator Bracket: A Lesson in Hardware Strength
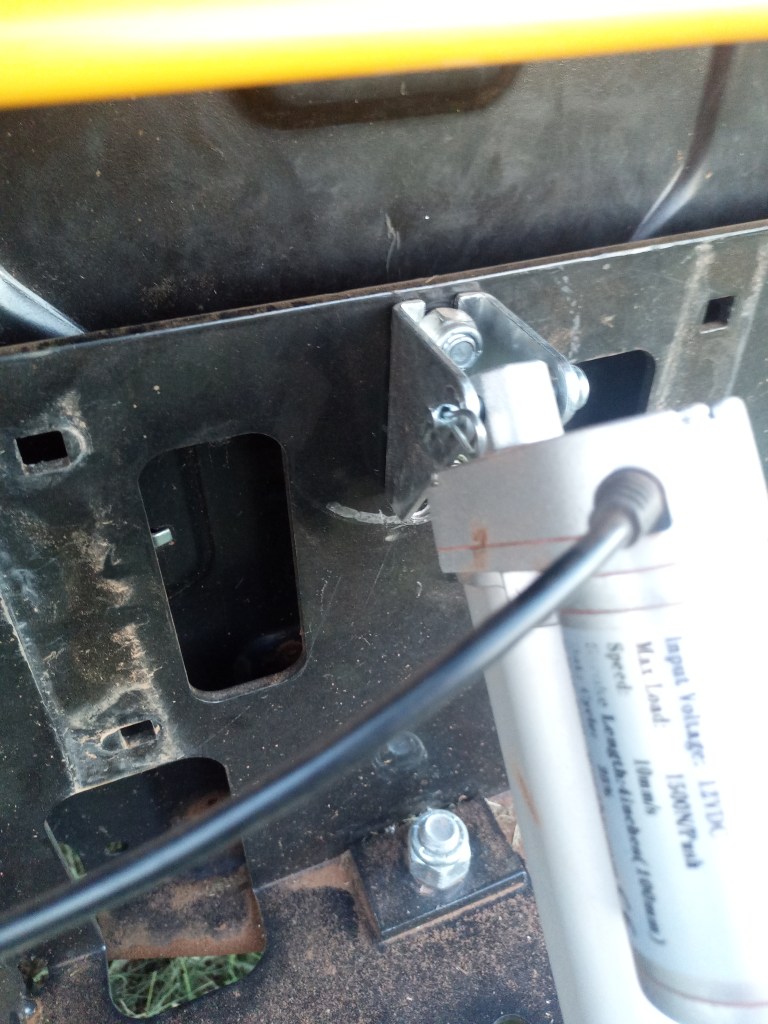
One of the lessons we’ve learned on this electrifying journey is that not all hardware is created equal. This revelation became evident when, after installing the new 4″ linear actuator, we encountered a problem with the actuator bracket that came with the original 6″ actuator.
The issue was straightforward but crucial. After lifting the 38″ box blade attachment, along with the added weight it bore, we noticed that the actuator bracket began to bend under the strain. This unexpected development prompted us to reassess the hardware we had used, as it had proven insufficient for the task at hand.
Luckily, the solution was readily available. The mounting hardware that came with the new 4″ linear actuator was noticeably thicker and better suited to handle the weight and demands of the project. We had the necessary components right at our fingertips.
To address this challenge, all we needed to do was drill the required holes to adapt this more robust hardware to the sleeve hitch. It was a straightforward adjustment that would reinforce the actuator bracket and ensure it could withstand the stresses of raising and lowering attachments without deformation.
This episode taught us a valuable lesson in the importance of selecting hardware that matches the demands of the project. It’s a reminder that every element of a DIY endeavor, no matter how seemingly minor, can have a significant impact on the project’s overall success.

Overheating Garden Tractor Transaxle
As our electric sleeve hitch project continued to evolve and provide invaluable assistance in our landscaping endeavors, we encountered a hiccup that highlighted the importance of understanding the limitations of our equipment, especially in scorching conditions.
The sun blazed down with unrelenting intensity, as the temperature soared to a sweltering 105 degrees Fahrenheit. This, in itself, was a challenge as the searing heat imposed its own demands on both us and our equipment. As we embarked on a mission to level out the soil for a shrub project, the issue emerged.
I pushed the accelerator forward to power the garden tractor, eager to get the job done efficiently. However, I soon noticed the tractor’s performance dipping – it was moving sluggishly. I initially attributed this decline in performance to the blade of the box attachment being lowered too far into the earth, creating resistance. Yet, as the day wore on, the issue persisted and worsened.
To our dismay, the garden tractor eventually reached a point where it simply refused to climb uphill, further complicating our project. Perplexed and concerned about the tractor’s deteriorating performance, we decided to shut it down and allow it to cool for a while, hoping it would recover.
However, our respite was short-lived. The hydrostatic transaxle of the garden tractor, which plays a crucial role in powering the vehicle, began to exhibit the same sluggish behavior as soon as it warmed up again. We knew something more serious was at play.
In a quest for answers, we delved into research and discovered a critical piece of information. It turned out that the hydraulic fluid used in garden tractors’ hydrostatic transmissions, like ours, has specific operational thresholds. When subjected to high temperatures, typically above 120-140 degrees Fahrenheit, the hydraulic fluid deteriorates and becomes unusable. This revelation provided clarity on the root of our problem.
With the mercury in the thermometer soaring and the extreme heat taking its toll, our garden tractor’s hydrostatic transaxle had succumbed to the temperature-induced stress. It was a moment of realization that reinforced the importance of understanding our equipment’s operating parameters.
To address this issue, we ultimately had to remove the transaxle from the garden tractor, drain the degraded hydraulic fluid, and reinstall the transaxle. We intend to cover this extensive process in detail in a future blog post, sharing the lessons we learned along the way.
This episode served as a poignant reminder that the electric sleeve hitch project, while a valuable addition to our toolkit, may find its ideal match in older garden tractors featuring gear-driven systems rather than hydrostatic transmissions. As we continued our journey, it became increasingly clear that there would be further lessons to learn, more challenges to overcome, and a wealth of experience to share.

Conclusion
As our journey through the electrifying world of the electric sleeve hitch project unfolds, each twist and turn unveils new insights and experiences. The challenges we’ve faced along the way have not only pushed us to innovate but have also deepened our understanding of the intricacies involved in harnessing technology to enhance our garden tractor’s capabilities.
From the early stages of design to overcoming hurdles related to actuator size, mounting position, and component durability, we’ve embraced the learning process. Our commitment to sharing these experiences with you, our dedicated readers, remains steadfast.
While the electric sleeve hitch has undoubtedly transformed our approach to lawn care and landscaping, it’s important to acknowledge the unique conditions that can impact its performance. The overheating episode, attributed to the unforgiving heat of a scorching summer day, emphasizes the necessity of tailoring our projects to the specific characteristics of our equipment.
Looking ahead, our journey continues with renewed vigor and a deepened appreciation for the challenges that arise along the way. As we prepare to embark on our next phase, we invite you to stay tuned for future blog posts that will uncover more trials and triumphs in the world of garden tractor modification.
Our commitment to innovation and knowledge sharing remains unwavering. To ensure you don’t miss any updates, insights, or solutions to the challenges we encounter, follow us on social media. Connect with us, and be part of our vibrant community dedicated to redefining the possibilities of lawn care and landscaping.
Thank you for joining us in this electrifying endeavor, and we look forward to sharing more of this journey with you.
Follow us on Social Media! Until then happy innovating!
