
Introduction
Welcome back to the next exciting chapter of our electric sleeve hitch project. In Parts 1 and 2, we embarked on a journey of innovation, designing the circuitry and assembling the components that would power this game-changing system. Now, in Part 3, the moment we’ve all been waiting for has arrived.
In this installment, we’ll transition from the workbench to the garden as we attach our newly created linear actuator circuit to the sleeve hitch of our trusty garden tractor. It’s time to witness our project in action, putting it to the test in real-world conditions.
As we prepare to take this final leap, we’ll guide you through the attachment process onto our sleeve hitch, share the results of our testing, and offer our thoughts on the overall performance of this innovative solution. Whether you’re a seasoned DIY enthusiast or just curious about the future of lawn care, this part promises insights and inspiration.
So, let’s roll up our sleeves one more time, head outdoors, and experience firsthand how our electric sleeve hitch enhances the capabilities of your garden tractor. The moment of truth has arrived, and it’s time to see how this project can revolutionize your lawn care and landscaping endeavors.
Attaching to the Sleeve Hitch
Before we dive into the hands-on aspect of attaching our electric actuator to the garden tractor’s sleeve hitch, it’s important to note that sleeve hitch designs may vary between different garden tractors and manufacturers. Your specific setup may differ slightly from the one described here.
The sleeve hitch I have, and the one we’ll be working with, is this one, which serves as the foundation for this project.
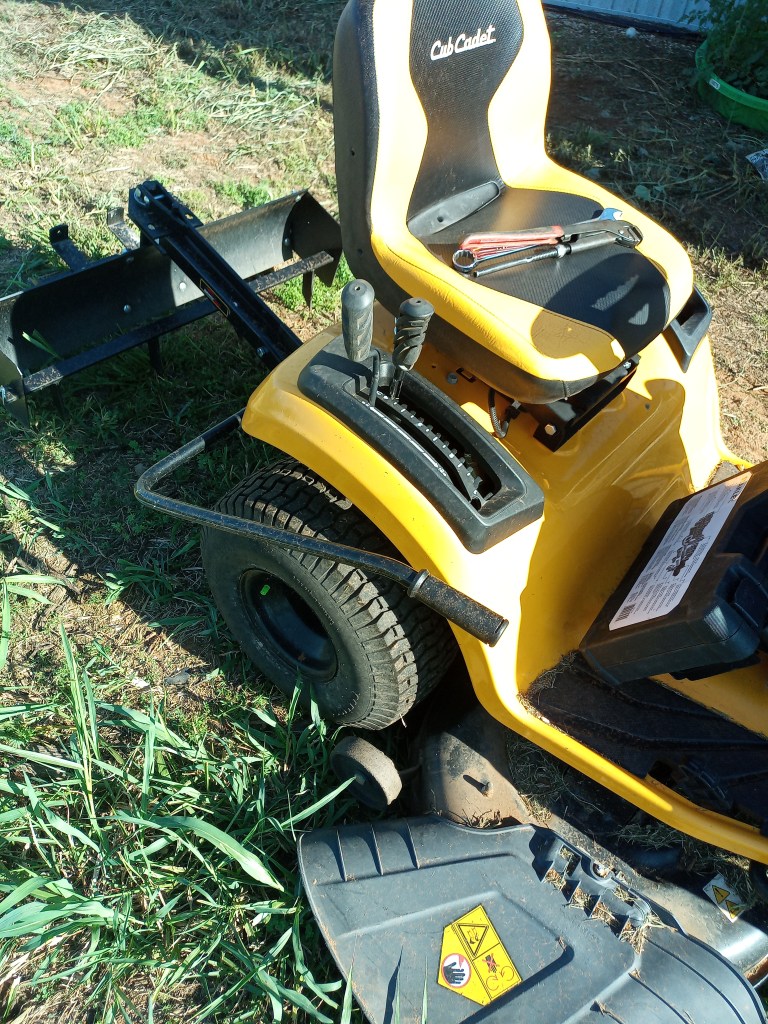
Removing the Manual Lever
Our first step is to make way for the electric sleeve hitch by removing the manual lever that the sleeve hitch comes with. This lever is no longer needed, as our electric system will take over the lifting and lowering duties.
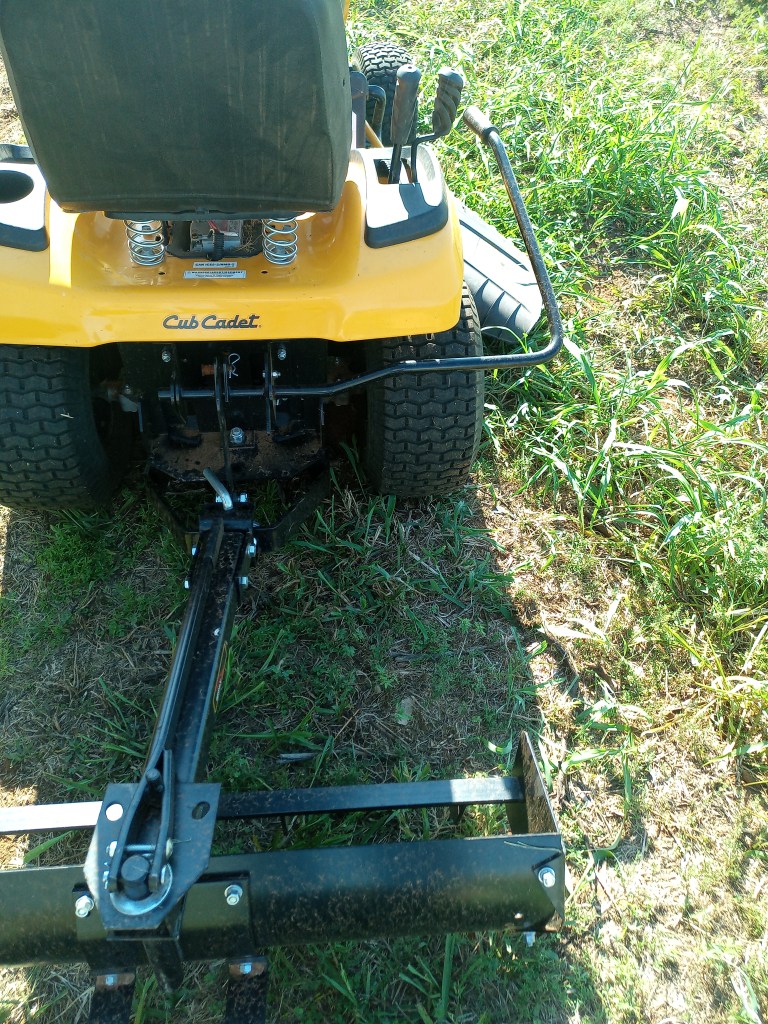
Drilling Holes for Linear Actuator
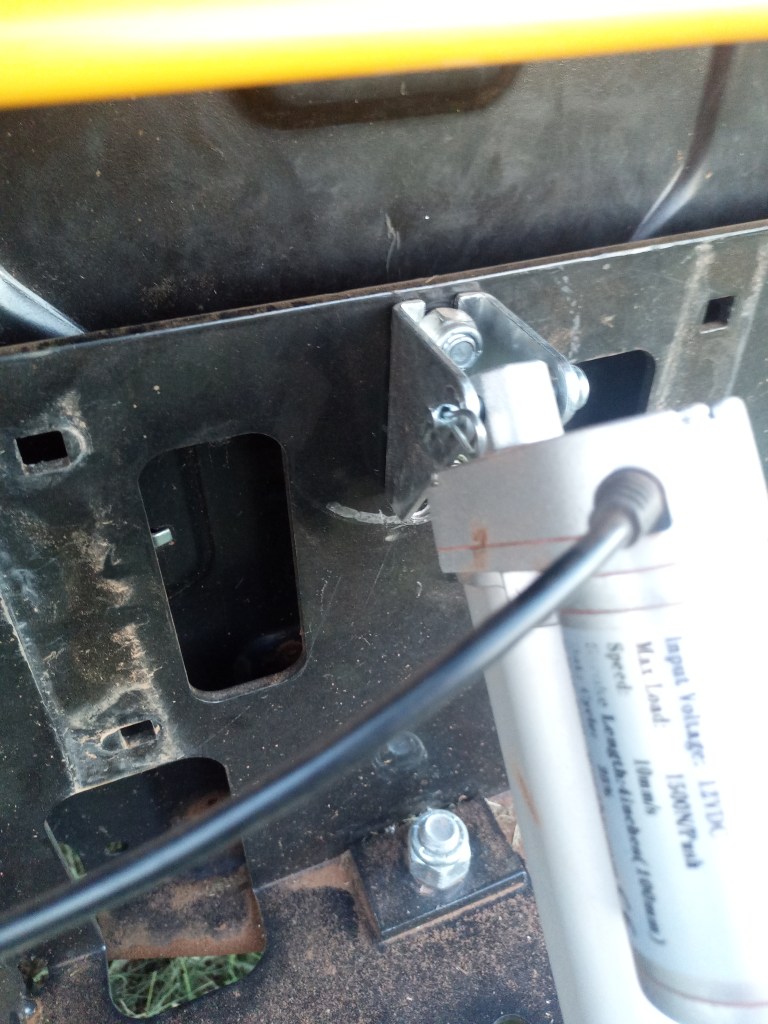
Next, we’ll drill a hole at or near the top of the sleeve hitch to securely bolt the actuator and its accompanying parts. This hole will serve as the anchor point for the top end of the actuator, allowing it to pivot and raise and lower attachments with precision.

Customizing Hardware
To ensure a snug fit, we’ll need to make some modifications to the accompanying hardware that comes with the actuator. This may involve drilling holes in the hardware pieces to align with the holes on your specific sleeve hitch. These modifications will enable us to seamlessly connect the actuator to the bottom of the sleeve hitch.

The Final Connection
With the holes drilled and the modifications made, it’s time to attach the other end of the actuator to the bottom of the sleeve hitch. This connection point will provide stability and control as the actuator performs its lifting and lowering functions. Lastly we need to make sure to connect the power leads to the garden tractors battery, in the correct polarity.
Testing the System
Now that our electric sleeve hitch is securely in place, it’s time for the moment of truth—testing the new system. We’ll fire up the tractor, activate the controls, and observe the linear actuator in action. This testing phase will help us fine-tune the system, ensuring that it operates smoothly and efficiently.
As we move forward with this electrifying project, remember that your specific sleeve hitch and tractor may have unique characteristics. Adaptations and adjustments may be necessary to accommodate these differences.

Putting Our Electric Sleeve Hitch to the Test
The true measure of any innovation lies in its real-world application, and our electric sleeve hitch is no exception. In this section, we’ll dive into the practical testing phase to see how our system performs under the demands of everyday lawn care and landscaping tasks.
Box Blade Attachment: A Real-World Challenge
For our testing, I decided to put our electric sleeve hitch to the test by attaching a 38″ box blade to it. This robust attachment is a versatile tool for landscaping, particularly when it comes to leveling and grading uneven terrain. With new shrubs planted in the front yard, I had some dirt leveling to do, making it the perfect opportunity to evaluate the electric sleeve hitch’s capabilities.
Effortless Control and Precision
One of the immediate benefits I noticed was the ease of control. Instead of manually manipulating a lever or handle, I had the linear actuator controller in my lap, and with a simple press of a button, I could raise or lower the sleeve hitch. This not only saved me considerable effort but also provided a level of precision that’s often hard to achieve with manual control.
Achieving a Level Surface
Controlling the height of the sleeve hitch allowed me to achieve a beautifully level surface of dirt in my front yard. Whether it was adjusting the depth for grading or fine-tuning the height for precise leveling, the electric sleeve hitch delivered the accuracy I needed for the task.

A Note on Speed
It’s worth noting that the linear actuator’s speed is deliberate and controlled. It moves at a steady pace of 0.55 inches per second, as stated in the documentation. While this may seem slow to some, it’s a deliberate design choice to ensure smooth and controlled movement. In practical terms, this speed was more than sufficient for my landscaping needs and contributed to the accuracy of the work.
As I wrapped up the leveling of the dirt for my new shrubs, I couldn’t help but appreciate how this electric sleeve hitch had transformed the experience. It not only saved me time and effort but also allowed me to achieve a level of precision that enhanced the aesthetics of my landscaping.
In the next section, we’ll delve into my overall thoughts on the project, reflecting on the journey from concept to reality and the impact this innovation can have on your lawn care and landscaping endeavors.
Thoughts
As I conclude this journey from concept to reality, it’s time to share my overall thoughts on the electric sleeve hitch project and its impact on my lawn care and landscaping endeavors.
Enhanced Convenience and Efficiency
First and foremost, I must say that this new electric sleeve hitch has proven to be a valuable addition to my garden tractor. It has made the work significantly more manageable and efficient. The ability to control the sleeve hitch’s height with the touch of a button, rather than relying on manual adjustments, has been a game-changer. It not only saves time but also reduces the physical effort required, which is especially appreciated during long sessions of yard work.
The Need for Patience
However, as mentioned in the section on speed, it’s essential to note that the electric sleeve hitch does operate at a relatively slow pace. This deliberate design choice, while understandable, does require a degree of patience. Whether it’s raising or lowering the attachments, the slow and controlled movement can take some getting used to. It’s not a drawback per se, but rather a characteristic to adapt to.
Traction Consideration
One aspect that became evident during my use of the electric sleeve hitch is the importance of traction, especially for garden tractors with hydrostatic transmissions like mine. The slow and steady movement of the sleeve hitch can sometimes result in the tractor getting bogged down, particularly on uneven or challenging terrain. To overcome this, I’ve contemplated adding tire chains or switching to tires with better grip on the rear wheels. These enhancements could provide the necessary traction to ensure smoother operation, even in challenging conditions.
Consideration for Different Tractor Types
It’s worth noting that the effectiveness of this system may vary depending on the type of garden tractor. Garden tractors with traditional gear-driven systems may find this electric sleeve hitch to be an even more seamless and efficient addition, as they inherently offer better traction and control.
In conclusion, the electric sleeve hitch project has brought a significant level of convenience and control to my lawn care and landscaping activities. While there are some considerations, such as adapting to the slower speed and addressing traction issues, the overall benefits of this innovation are undeniable. It’s a testament to the power of innovation and a glimpse into the potential enhancements it can bring to your gardening and landscaping experiences.
In our final section, we’ll wrap up this post and offer a glimpse of what’s on the horizon.
Conclusion
As we reach the end of this journey into the world of electric sleeve hitches for garden tractors, I’m thrilled to share the progress we’ve made in enhancing the utility and efficiency of these trusty workhorses. The electric sleeve hitch project has opened up new possibilities and streamlined the way we tackle lawn care and landscaping tasks.
With the convenience of controlling sleeve hitch attachments at the touch of a button, the manual labor and time required for adjustments have significantly decreased. The system performs admirably, though the deliberate slow pace may require some patience. The addition of better traction solutions, such as tire chains or grippier tires, can further optimize the experience, especially for those with hydrostatic transmission garden tractors.
It’s clear that the future of lawn care and landscaping is bright, thanks to innovative projects like this one. As we explore and experiment with new ideas, we continue to push the boundaries of what’s possible in our gardens and yards.
If you’ve enjoyed this journey as much as I have, I invite you to stay connected and be part of our vibrant community. Follow us on social media to receive updates on the latest developments, insights, and exciting projects on the horizon. Our gardening and landscaping adventures are just beginning, and I’d love to have you along for the ride.
In the next installment of this blog series, we’ll dive into some of the challenges and issues I encountered during this project. It’s not all smooth sailing in the world of innovation, and I’ll share my experiences in overcoming obstacles and finding solutions. Join us for an insightful exploration of the hurdles we faced and how we tackled them head-on.
Thank you for being part of this journey, and I look forward to sharing more adventures and innovations with you in the future. Until then, keep exploring, keep innovating, and keep transforming your garden tractor into a versatile and powerful tool.
Stay tuned for Part 4, and let’s continue our journey together!
